|
|
All reported solutions for the Check Printing Software 2000 product are documented in this Tutorial and FAQ site. As this software has been discontinued, all support is limited to this document.
The following is a tutorial and "virtual tour" of our Check Printing Software 2000 software. It will allow you to see how the software works and how it would look running on your PC.
After program installation, choose the Check Printing Software 2000 icon under Start - Programs - Check Printing Software 2000. A password is needed when Check Printing Software 2000 is first started. The initial program password for Check Printing Software 2000 is "smile" - without the quotes.
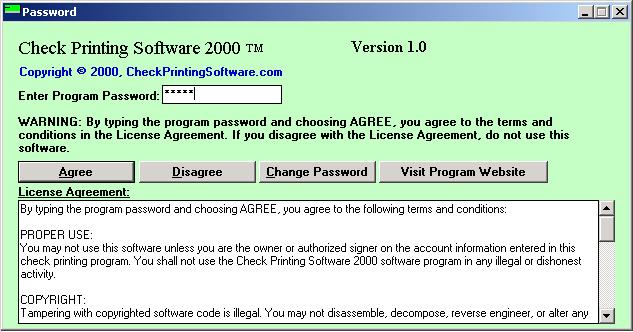
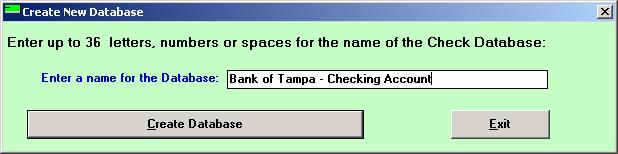
Once you enter the password and choose Agree you will need to create or choose a database to work with. Each database is a separate set of checks that are not related in any way to any other database. Choose the Create New Database button and enter the name of your database. You probably will want to use your bank's name and the purpose of the database as the name as in this example:
We strongly suggest you create a few different databases for your needs. For example, you may wish to create a separate database file for employee payroll checks and another for your business checking account so you can print your own checks. It is necessary to create a separate database for each bank account you want to print checks for. When creating more than one database from the same bank account, you should use check numbers that are far apart to avoid duplicate check numbers. You can enter the starting check number in the first check of each database. The software will automatically manage the check numbers inside each database file and will always use the highest check number available for the next check.
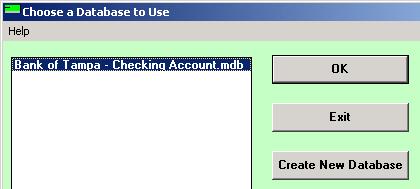
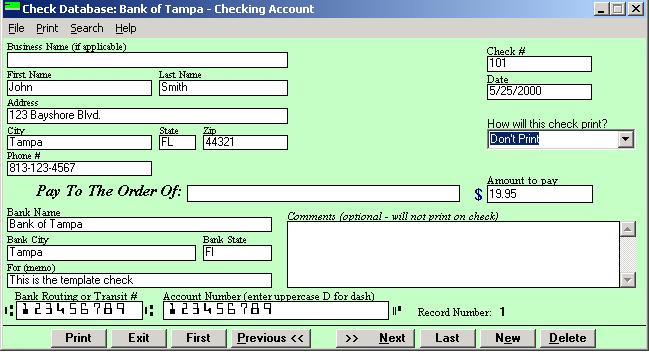
After you create the database, highlight it and choose the OK button. Next, you will see the data entry screen. The first check in each account is used to set default fields. The default fields are used to create new checks in the database and to print blank checks from the print menu. There are three basic methods of printing checks from this software. These are described below:
Method #1 - Print checks from the internal database. To create a new check at this screen you will need to select the NEW button at the bottom of the screen. This will create a new record in the account database for each check. This is useful if you choose to print the same bank checks over and over again, for example, payroll checks or monthly bills. Be sure to choose the option "Multiple Times" in the "how will this check print" drop down box if you intend to do this. Most of the fields you are going to enter data into on the data entry screen are arranged in the format of a standard check. To move to a previously created check, use the navigation buttons at the bottom of the data entry screen.
Method # 2 - Print blank checks using the information on the first check. This is probably the easiest way to print checks. Just fill in all fields of the first check in the database and then choose the print button. At the printer control screen, choose Print Blank Checks - Regular Blank Checks from the menu. The program will print checks similar to the ones you get from a bank.
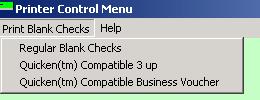
Method # 3 - Create Pre-Printed checks for use in Quicken, QuickBooks or Microsoft Money. If you use one of these applications (or another application that uses these types of pre-printed checks) you can save yourself a lot of money by printing these checks yourself. Just fill in all fields of the first check in the database and then choose the print button. At the printer control screen, choose Print Blank Checks - Quicken Compatible 3 up from the menu. 1 up voucher checks can also be printed in this way. After these checks are printed, you must use your accounting application to print the data on the checks.
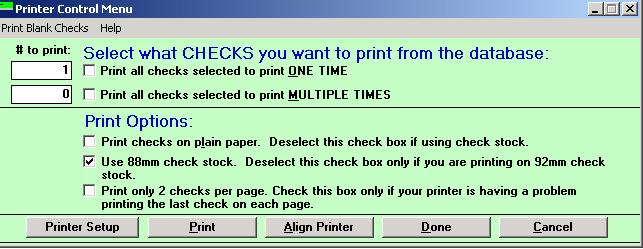
If you want to print checks from the database, you will need to select which checks you want to print at the bottom of the "Printer Control Menu" screen. Selecting "print all selected to print once" will print all checks that have the print field set to "print once". Selecting "print all selected to print multiple times" will print all checks in the database that have the print field set to "multiple times". You can select both of these fields to print both types of checks in one print job. To the left of each check box there is a small box with a number in it. This is the number of checks that will print when you select the box. This will give you an idea of how many checks to load into the printer.
You can use combinations of these methods in the same database; this software is designed to make sure there are no check number conflicts when doing this.
You can print checks selected to print multiple times as often as you want to. Check Printing Software 2000 cannot prompt you when it is time to print these checks again, therefore, you should print them on a regular basis. For example, in a monthly check database, choose to print "all selected to print multiple times" on the first Monday of every month. After every successful print job, monthly check numbers are renumbered and dates are set to the current date to avoid duplicate check numbers and incorrect dates.
Checks are printed on letter size check stock or regular paper that has a light design on it. 3 checks can print per page. We highly recommend printing on check stock, Click Here to order your check stock.
As you can see, the software is easy to use and operate. A few other features of the software such as searching through the database are not covered here but are easy to understand.
Step 1: If you just installed the program using Windows 95 or Windows NT and did not perform a proper shutdown for your PC before rebooting it, you may need to install the MICR font again. Choose Start - Settings - Control Panel - Fonts. Double click on the MICR 65 font and make sure it states "Copyright IDAutomation.com, Inc." Clicking on the font should activate it if it had problems before.
Step 2: To properly print the MICR line on checks, your PC may need to be setup to print True Type fonts as graphics to your printer. To do this, click Start - Settings - Printers. Select your printer, choose Printer - Properties, choose options to make sure "Print True Type as graphics" is selected; look in the the Font or Graphics folders for these settings. You may also have to change the print mode to "raster." If these options are not present in your printer properties, try a few of the other settings such as "download True Type as bitmap soft fonts".
Step 3: - Try using another compatible print driver: The "MICR font not detected" error will occur on some print drivers (such as the HP LaserJet 5 SI printer driver) that are unable to print the MICR font properly. Some other print drivers will cause this error to appear, however, the printer will print checks and Checks without problems. In this case, just click OK to bypass this screen and use the program. To fix this problem for the HP Laserjet 5 SI, install the HP LaserJet III driver on the port connected to the 5 SI printer and make it your default printer. This appears to be a bug in the driver from HP, they may have an updated driver on the Internet by now that you can download and install.
Step 4: - Reinstall your print driver by the following method.
NOTE: the printer properties dialog box may include options for number of copies, landscape, portrait print, etc. these options should be set to default settings which should be 1 copy, Portrait Orientation and Letter size paper.
Verify you can print from other applications such as Notepad or Wordpad. If you are unable to print from other applications you will not be able to print from Check Printing Software 2000 either and the problem is not with Check Printing Software 2000.
Make sure you are printing on check stock that is 88mm in length. This is the check length of most standard letter size 3up check stock. Deselect the 88mm check box if you are printing on check stock that is 92mm in length or checks on plain paper and you want to print exactly 3 checks per page. By printing exactly 3 checks per page, you only need to make two cuts in the paper for every 3 checks printed. NOTE: If your printer has problems printing the last check you will have to use the standard printing method. Some printers do not have a printable area large enough to print the last check if using the 92mm check length; Most LaserJet printers can print the last check while most ink jet and bubble jet printers cannot. If your printer cannot print the last check , the printer will usually print this information on the next page or give you an error. To get around this, choose the Align Printer button in the print menu and try decreasing the Vertical Start Position Number. As a last resort, choose the option to print only 2 checks per page.
Also be sure the check stock is in the printer properly. The stock should be in the printer so that the first three checks are fed through the printer before the small perforation tab at the bottom of the check stock.
If you are still having printing problems, try the suggestions for MICR font problems.
This error occurs when you do not have a printer installed that supports True Type fonts. Install the correct print driver for your printer or obtain a newer print driver for your printer.
Cannot Print to a Network Printer
If you are printing to a printer that is not attached directly to your PC, you may have to capture the LPT1 port. In Windows 95, click Start - Settings - Printers. Under printer properties, select Capture Port, type in the network path to the printer and select LPT1 for the "print to the following port" selection.
This can occur if you do not have the "Times New Roman" True Type font installed properly. Open up control panel and install the Times New Roman True Type fonts. Make sure you have all four types of the fonts installed. You should have Times New Roman, Times New Roman Bold, Times New Roman Italic, and Times New Roman Bold Italic. These files come standard with Windows and are required by Check Printing Software 2000 to properly display and print text.
Either the bank notifies you of problems reading the MICR line of printed checks or the checks com back from the bank with an additional strip attached to the bottom of the check indicating that the information had to be re-entered and printed again to process. Check the following:
Error: Setup Cannot Continue...System Files Are Out of Date
During the software installation, you may get the following message:
"Setup cannot continue because some system files are out of date on your system. Click OK if you would like setup to update these files now. You will need to restart Windows before you can run setup again. Click Cancel to exit setup without updating system files."
If you click OK, the application installs the correct files. If you select Cancel, the operation stops. The setup process will not complete successfully until the correct file has been installed on the system, therefore you must select OK to this message, reboot and run the install again.
If you choose Cancel, the install program will terminate. The application setup will not complete until the latest version of the required files are installed on the system. This error mainly occurs if Oleaut32.dll is not the latest version.
Error Still Appears After Choosing OK and Rebooting: Setup Cannot Continue...System Files Are Out of Date
Cause: Something is interfering with a replace and rename operation and required files are not updated. Therefore, once the computer reboots and restarts the installation program, the same error message appears.
The following are resolutions to this problem:
MD C:\TEMPThis will save the TEMP and TMP environment variables to a folder named "Temp" that resides on the C: drive. Once these environment variables are set, the application should then install and continue past the message on reboot.
Set TMP=C:\TEMP
Set TEMP=C:\TEMP
If exists c:\temp\*.tmp del c:\temp\*.tmp
comment it out by placing "REM" in front of it.
Install Application seems to be Installing an Unrelated Application / Other Setup & Install Errors
If the setup program does not properly install Check Printing Software 2000 try the following:
Message about Replacing Files During Installation
During the installation, you may also get messages to replace files. This is because the program requires these updated files to run. After you get this message, always choose to replace the old files with newer files but do not choose to replace newer files old ones.
Run-time error 3426 - this action was cancelled by an associated object.
This indicates that the database is corrupt or all fields are not filled in. Try creating a new database and fill in all fields.
After a hard drive replacement or crash, Check Printing Software 2000 is restored from a backup but does not function correctly or gives errors.
You have to reinstall with the latest version because several files are needed that are stored in the Windows System directory that are not usually backed up. After a fresh install, you only need to copy the data files to the new Check Printing Software 2000 directory. These files can be easily identified because they have the .mdb extension
For all other problems try reinstalling Check Printing Software 2000. Go to Start - Control Panel - Add/Remove Programs and Choose to Remove Check Printing Software 2000. If asked to Keep or Remove files, choose Remove. Reboot, Download the latest version and reinstall. After a fresh install, you only need to copy the data files to the new Check Printing Software 2000 directory. These files can be easily identified because they have the .mdb file extension.
If a Reinstall Does Not Work:
All reported problems are documented in this on-line technical support document. If you are having other problems not mentioned here they are probably unique to your PC. You can determine this by installing Check Printing Software 2000 on another PC. If it installs and runs properly on one PC and not on the other, the problem is usually with the PC and not the Check Printing Software 2000 program, even if other applications seem to function normally. This is because the Check Printing Software 2000 program uses your PC in ways that other programs do not. The problem could be any of the following:
Check Printing Software 2000 technical support will be unable to assist you in solving these types of problems. Some of these problems can be corrected by reinstalling Windows. Support to resolve these problems should be obtained from your PC vendor or Microsoft.
Check Printing Software 2000 has been tested and is fully compatible with:
Check Printing Software 2000 is not compatible with any UNIX, MAC or OS/2 operating systems.
Since most of the banks now use OCR (Optical Character Recognition) to read the MICR font line on checks and Checks, special toner is not usually required. The regular toner used in LaserJet printers is somewhat magnetic and can usually be read by banks that are not using OCR. If you have a problem processing checks through your bank, verify that the MICR numbers are positioned at the proper distance from the bottom of the check. To adjust this, choose Align Printer in the Printer Control Menu. The bottom of the MICR line must be positioned 3/16 ?1/16 of an inch from the bottom of the check. You can also compare to a pre-printed bank check. If still you have a problem processing checks through your bank you should obtain MICR toner, it can be ordered from the MICR Toner Site.
With Check Printing Software 2000 you can print your checks on blank regular paper, however, you should use paper that has a light design or grain of some kind on both sides since of it. Some banks may have a problem with a plain white check because they could be easily duplicated. You can usually find a good deal on this type of paper at an office supply store.
Although you can print your checks on regular paper, purchasing check stock has the following benefits and security features:
This check stock can be purchased from the Check Stock Site.
Check Printing Software 2000 has been tested and is year 2000 compliant. Remember, you should enter dates as 3/5/2000 instead of 3/5/00.
If you choose to print checks from the database, our software does not print out the price amount in "long hand" because it is not necessary. The "long hand" price was originally needed on bank checks that were hand written in case the amount could not be determined by poor hand writing or to verify the accuracy of the amount. When printing checks from the database, our program places asterisks before and after the amount, preventing anyone from adding a zero to the number.
No - this feature is available in the MICR E13B Font Advantage Package from IDAutomation which includes an advanced check printing application.
No - the software does not have this capability and there are no plans to include it in a future release. The import feature is available in the MICR E13B Font Advantage Package from IDAutomation.
The software does not have this capability. However, you can purchase the Draft Creator product that contains the same check printing functionality as this software and includes bank draft creation.
The Check Printing Software 2000 product has been discontinued and is no longer available from this website. As an alternative, IDAutomation recommends the MICR Font Check Design & Printing Software.
| ©Copyright 2015
IDAutomation.com, All Rights Reserved.
Legal
Notices. Barcode Fonts | Components | Scanners | Support | Contact Us |
Loading
|
|
Over 70% of Fortune 100 companies use IDAutomation's products to automate their businesses. |
|
 MICR Font Advantage
Package
MICR Font Advantage
Package